Sunday, June 28, 2015

One with Nature!

I decided to have a bit of fun watercolouring these leaves/trees from the newly released One With Nature. I went with atypical colours for leaves because that seemed fun at the time (Spiced Marmalade, Crushed Olive, Seedless Preserves and Peacock Feather if you're curious). I also decided to go with a more fun sentiment- this one is from Ice Cream Dream.

I had the hexagon embossed cardstock on my stash from a failed card attempt from the previous date. It worked on this card, especially with the colours I had already selected. I dug into my ribbon stash for some cute matching ribbon and that was that!

And even better, the card completely works for this week's Simon Says Wednesday Challenge! The challenge this week was to feature Simon Says Exclusive Product and the theme was Anything Goes!


Mists+Stamps

When I saw this week's Simon Says Monday Challenge: Stamps+ Mist, I knew I wanted to give it a go. Of course, I use stamping as one of my main tools for card-marking. However, although I have made mists a few times, I have rarely managed to use them on a card to my liking. I really wanted to try my hand at using mists and actually liking the end product.

Here's the first card- I made my own mist using few different blue reinkers and water. I taped down the Ledger Drop stencil onto some watercolour paper and got to misting. Once I was relatively happy with how it turned out, I stamped the greeting from Many Thanks. Finally, the final touches were a few vellum flowers attached with blue brads and a few blue rhinestones. I was feeling just "ok" about the card but decided to move.


The next day as a bit of a warm up, I got out the Zig Zag stencil and didn't even tape it down- I just placed it on top of some watercolour paper and started misting. I used 3 different colours of mist I had made- the blue one from yesterday, a yellow/gold one and a brown one. Well, was I ever surprised when I actually liked the messy, chaotic look to it! I picked out the lace next thinking that would pair well. Finally, I decided on Spring Blooms. I used the colours of the misted background as a guide for the ink colours. I went with all Stampin' Up inks here- Baked Brown Sugar, Hello Honey, and Lost Lagoon. The greeting is from Fanciful Feathers. I was definitely more satisfied with this card.


Overall, I was really glad I went for the challenge and stepped a tiny bit out of my comfort zone. It's good to try different techniques and products!


Thursday, June 25, 2015

Leafy Father's Day


I know Father's Day was last weekend, but my dad was out of town, so he's not getting the card until this upcoming weekend.  Although, you could also easily apply these techniques and layout to a different sentiment.

I was feeling really inspired by all of the cards I saw using the newly released One with Nature. Being in Canada, I knew that even if I ordered that set (which I have), I wouldn't be receiving it for at least a week. When you feel that inspired, sometimes you need to see what you can do with what you have.

I pulled out this oldie, but goodie Stampin' Up! set (All the Best) and decided to ink them up with distress inks. I have the spots, so I just kind of inked up randomly with several different colours, ensuring that I covered the whole stamp. I stamped that onto my favorite cotton paper. Once they were all stamped, I went over the images with a fine, wet brush to blend and smooth the colours.

After all that work, I didn't want to hide my background, so I decided on a bold and clear embossed die cut "happy" with a small sentiment strip.


Supplies:
Stamps: All The Best (SU), Men of Life (PTI)
Ink: Various Distress Inks, Ripe Avocado
Paper: Cotton Paper (Savoy), Ripe Avocado, Simply Chartreuse, Meadow Moss
Accessories, etc.: Happy die (happy trio- WP9), clear embossing powder


Saturday, June 20, 2015

Cool Treats!

After seeing the recent Simon Says Stamp Color of Fun Blog Hop and then the Wednesday Challenge, I was feeling very inspired! I decided to focus on two of my favorite techniques- Heat Embossings and Watercolouring and one of my favorite products- Distress Inks.

The watercolored ice cream card by Yoonsun Hur was especially inspiring! I don't have any of the products from the new release yet so I decided to see what I could make with the stamps in my stash.  I pulled out the Ice Cream Dream stamp set. What's great about this set is it's line art, which makes for easy watercolouring!

I stamped various ice cream treats and popsicles on the cotton paper with versamark and then clear embossed them. Then I started to paint each image using Distress Inks. I really love the vibrant look you can achieve with these inks as watercolours!

Finally I needed a sentiment on there, I decided to die cut the word happy out of black cardstock and then I stamped the word birthday (from the Birthday Balloons set) on a small strip of paper.


I have to say I really like how the card turned out!


Wednesday, June 10, 2015

Stars & Watercolour

Here is the anniversary card I made for my husband this year. I bought this set when it first came out because I love all things starry and also because I thought the sentiments were sweet. I had yet to make a card for my husband and when he read the sentiments, he may have teased me a bit at the cheese factor. So because of that I decided I had to use it on his card. I'm cheeky like that :)

For this background, I worked in sections, wetting the paper and then dabbing the inked up paintbrush into the water, letting the ink blend and move with the water as it pleased. I really like this look and you can make it as light or as bold as you like. If you want more colour, you can go back in with more ink, or use slightly less water.

Once I was happy with the background, I decided on my sentiment placement, then started adding in the stars.

The final step was the embossed, popped up star. I don't dark blue embossing powder or craft ink, so I did the old stamp in Versamark first and then into your dye ink trick. Doing this doesn't damage the dye ink pad and it gives the image enough stickiness for embossing powder to stick to!


Supplies:
Stamps: Super Stars (PTI)
Ink: Tumbled Glass, Chipped Sapphire, Broken China (Distress Inks), Versamark, Black Onyx, Enchanted Evening
Paper: Enchanted Evening, Brushed Silver, Savoy Cotton 118lb

I know the price point may seem a bit steep for a 25 pack, but I have to say, I absolutely love this paper for watercolouring! I initially bought it to use with my letterpress kits, and it really does press quite well. However, I happened upon watercolouring onto it by happy accident and now I almost always pull it out for that. I have both the bright white and the natural white. I love it since it's a smooth surface. I've always disliked the extremely textured watercolour papers. 

Thanks for stopping by!


Sunday, June 07, 2015

Stencilled Backgrounds

On Saturday, I picked up these fun Bo Bunny stencils to try out. I didn't have any cards in mind, I just wanted to see how well they did. The next day I came back to the backgrounds and decided to make a few cards.

I have to say it was nice not to have to tape down the stencil. Also, since these are mildly intricate designs, it was great not having to worry about them shifting or popping up mid-sponge.

First up, I wanted a cheerful card. The colours I used were PTI's Harvest Gold, Summer Sunrise, Orange Zest, and Terracotta Tile.  Next I die cut 3 layers of the WPlus9 hand lettered hello from some Basic Grey cardstock. I adhered those together to make it dimensional. Last few steps were stamping the word "sunshine", and then getting my layers altogether and finishing it off with some satin ribbon.


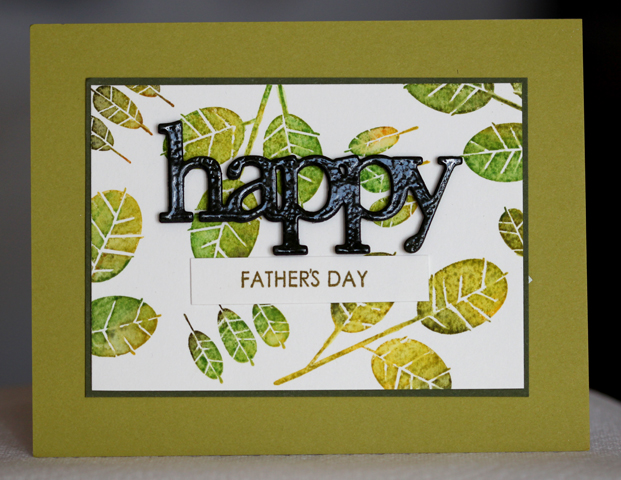
This card features the first stencil from the pack I used. If you know me well, you may know that I like stars, quite a lot! So this stencil definitely "spoke" to me! I wanted a rainbow look, so I decided on PTI's Hawaiian Shores, Limeade Ice, Harvest Gold, Summer Sunrise, and Berry Sorbet. Since I had the background already cut as a square, I decided to make a 5.5x5.5 card. I die cut a few stars, and sponged them. For added pop, I also clear embossed them. The "happy" was die cut three times and made to be another dimensional sticker. I paired that with one of the birthday greetings from the Whole Lotta Happy set.


For my final background, I had gone with blue tones. I wanted a bit of an ombre look, although I foresee myself using a rainbow colour scheme in the near future...

I went with PTI inks once again- Enchanted Evening, Blueberry Sky, and Spring Rain. Ever since I got the reinkers for these, I have been quite happy with how they sponge using the mini blending tool. Whatever ink you decide to use with blending or sponging techniques, I highly recommend keeping the associated reinkers. I definitely plan on getting the reinkers for the distress inks eventually, as I use those quite a bit for watercolouring and blending.

Anyway, back to the card, with this background, I wanted something a bit different from the first two. I decided that Spring Blooms would go nicely. I wanted something to contrast with the blues so I decided on yellows (Harvest Gold and Summer Sunrise). The green was a bit trickier to decide. I found that most of the PTI greens were too yellow heavy for this card and the one that's not was too vibrant. I ended up going with Stampin' Up!'s Pistachio Pudding. It had a nice softness that stood out enough from the blue background, but still coordinated with the yellow flowers.

I stamped the flowers and leaves and fussy cut those out. The sentiment comes from Strictly Sentiments 1.


I would definitely recommend these stencils for ink blending. I had no issues with them getting stuck to or damaging the paper. They cleaned very easily, almost even seemed to repel the ink a bit. I'm not sure how they will do with texture paste. I may give the final stencil (the heart one) a go, as I am not as attached to that one!

Thanks for stopping by.


Thursday, June 04, 2015

TBT Challenge

I saw the throwback challenge over on Dawn's blog and thought it would be fun to play along. I loved the use of the Fanciful Feathers in the post and thought I would use that set too, since it had been too long!

For the large feather I inked up with the dark blue first, then went over with the lighter ink and made sure they blended before stamping on the paper. I like doing this a lot with similar coloured inks. It makes a nice ombre effect!


I also thought I'd share this card that I made several weeks ago. I only shared it on Instagram, but really liked how it turned out! I stamped the flowers using various Distress Inks and then applied water to give them a painted look. The hello die was stamped with the sparkly versamark and then clear embossed.


Supplies:
Card 1- Stamps- Fanciful Feathers