Friday, August 31, 2018

All About Layering 1

Happy Friday!


I have another Altenew Academy card to share today. This card is for the All About Layering 1 class. This is a great (and free!) class that helps you learn how to best line up and use your Altenew layer stamps. There are loads of fun card ideas too!

The class features 
  • Golden Garden
  • Scribbled Flowers
  • Whimsical Flowers
  • Painted Flowers
  • Painted Poppy
  • Layered Lily
  • Vintage Flowers
  • Vintage Roses
  • Watercolor Wonders
  • Painted Butterflies
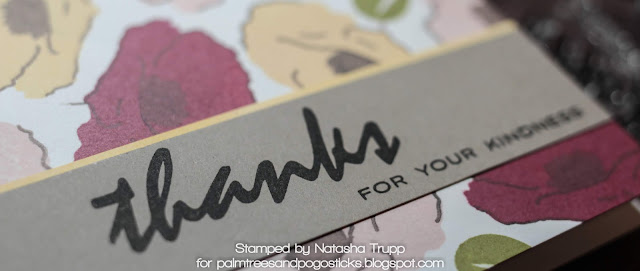
I decided to have some fun with the Painted Poppy set. I started off with the main line art image of the poppy. I did some careful inking to avoid the stem, since I only wanted the blossoms on here. Next, I decided on the rest of my colours and stamped the solid corresponding images, being sure to not have the same colour immediately next to each other. To add a bit more interest, I stamped the solid image of the leaf image in the remaining empty spaces. I really love how it turned out.

The final touch was to figure out a sentiment. My friend let me use her Many Thanks set. This set is really quite great for any sort of thank you card. I just loved using it! 


Thursday, August 30, 2018

Let it Shine!


Glitter, gems, foil-there's just something about bringing a little sparkle and shine into your cardmaking that can take it to the next level. As part of my Altenew Educator Certifications Program, I've been going through several classes. The latest one I completed was the super fun Let it Shine with the fun and talented Carissa Wiley Her blog is called Sprinkled with Glitter, so you know, she is sparkle cardmaking royalty!

There are lots of fun ideas in the class for using various sparkly and shiny products. What I loved about this class was the idea of using multiple products together. I tend to already use gems, embossing powder, and glitter separately on my projects, but what about all together? That's what is so fun about classes, you see techniques from a different prospective!

For my card, I thought it'd be fun (and a little crazy), to take the animals from Geometric Menagerie and glitter them up! I started by embossing the bear image in black embossing powder. Then I took a fine tipped bottle of glue and started filling in non-adjacent triangles. I started with the aqua/teal glitter. Then I filled in even more triangles, this time using the lime green glitter. And finally, I really liked how the white triangles looked, but I wanted an even sort of image, so I added more glue and used white glitter in that remaining triangles. Super fun hey? It wasn't even all that time consuming.

Next, I decided on a sentiment from Crafty Friends. I figure this is the sort of card that a fellow crafter would really appreciate! I adhered the cut out bear to the white layer and then brought in my third shine element, aqua, white, and lime green gems!


Thanks for dropping by!

I'll have my next batch of class projects for All About Layering and All About Layering 2 in the next few days.

Monday, August 27, 2018

Fall to Layout #86 Take Two

Hi everyone!
Sorry for the delay. I had a crafty get-away this weekend with my friend Chera. We both made the sketch, but were too busy crafting to actually take staged pics for a Sunday post!


The dimensions are pretty straightforward:
Card Base: 4-1/4 x 5-1/2
Main Layer: Any proportionately smaller rectangle. I think Chera used close to 3-1/4 x 4-1/2. I used 3-3/4 x 5.

Here's Chera's card. She used a few different products. The leaves (and dies) are from the Autumn Leaves set by WPlus9 Designs. The thanks die is called Thanks Twice is by Create a Smile. The rest of the greeting is from the Hero Arts Thanks Stamp and Die. I just love the mix of luscious colours she used for the leaves!


We were both apparently in the mood for fall themed cards. 

I got this fun ghost themed set Booyah by Lawn Fawn, just before heading out to her place, so it was definitely on the list to get used. I used the ghosts as the clustered circle elements. I stamped the ghosts and many of the hat/wig elements and coloured them with Copics. I fussy cut them and also made use of a stitched rectangle die for the main layer. I added a few gems for some added sparkle.


If you play along, please leave a link below!


Sunday, August 19, 2018

Fall to Layout #85

Happy Sunday!


I have a "sweet" card for you today. Once again, I decided to take a look at the images I used on the sketch and specifically choose something different from the sketch image.


Measurements:
  • Card Base: 3-1/2 x 6
  • Main Image Layer: 3-3/8 x 5-7/8
  • Patterned Paper Layer: 3-1/2 x 1-1/4
  • Ribbon: 3/8 inch wide
Here's my card. I grabbed a few different sweet treat images from a few different sets.I stamped them on the white layer using the sketch as a guide, leaving room for the sentiment. Next I decided on some patterned paper and colour matched my Copics to that piece of paper.  The ribbon is from a large roll of 3/8 inch grosgrain ribbon I have had for a long time. I decided to add a few white gems to add a bit of texture to the card.


Supplies:
Stamps: Baked with Love, Beam Me Up, Sweet Friends, Year 7
Ink: Memento Tuxedo Black
Paper: White, Really Rainbow 6x6 paper pack, Black
Accessories, etc.: Grosgrain ribbon, Copics, Gems

If you play along, please leave a link!

Tuesday, August 14, 2018

Sweet Wishes


As promised, I got the sketch card done. Today is a welcome (albeit temporary) relief from the heat. So it was a perfect evening for crafting! Just as a reminder, here is the sketch #84.


Dimensions:
  • Card: 5x5
  • Image Panel: 2-1/4 x 2-3/4
  • Image Panel Frame: 2-3/8 x 2-7/8
  • Scallop Border: 5 x 1-1/4


Here's my card. I decided to use the milk and cookies set by Lawn Fawn. I stamped the glass and two of the cookies. I masked the bitten cookie so that I could have it overlapping the full one.  I also masked the milk portion of the glass so that the entire straw was not visible. The little heart has some clear nuvo drops onto to give it some fun shine.

For the background I used the Bahama Blue Memento ink (once stamped off) onto some Tempting Turquoise. I found an older EK Success scalloped edge punch and used that with some Real Red to make my border.


Supplies: Stamps: Milk and Cookies (Lawn Fawn)
Ink: Memento- Tuxedo Black, Bahama Blue, Lady Bug, Versafine- Black Onyx
Paper: White, Black, Real Red, Tempting Turquoise
Accessories, etc: Nuvo clear drops, copics, scalloped edge punch

If you would like to join in the challenge, be sure to link up in the previous post.

Sunday, August 12, 2018

Fall to Layout #84

Happy Sunday everyone!

Sorry for the delay. It's a gross heat wave here right now, so I'm not doing that much crafting this week. I don't actually have a card to share.

I have the sketch up if you are wanting to get inspired. You can also check out my original challenge card here.


I'll try and get a card made on Monday or Tuesday. It's supposed to be a little cooler (high of only 25 on Monday and 18-19 on Tuesday) so hopefully that will be some relief from this heat!

This is now...


This was from December 30th. Yep we sure get both extremes here!


If you play along, please leave a link!

Wednesday, August 08, 2018

Easy Ink Blending


Hello everyone. I hope you're having a good week so far.

I've got a fun Altenew Academy project to share today. I've really been enjoying these classes. Today's project is from the Easy Ink Blending Techniques class. This class really inspired me to try something new. It's funny, I love doing many techniques, but the thought to combine these two techniques never cross my mind. Let me tell you, game changer! 

First I decided on my stamps- Coffee Love is such a fun set. I love the sketched illustration style to it. Once I was set on the images, I decided to use a coffee colored palette- I used Distress Inks here- Ground Espresso, Gathered Twigs, Wild Honey, and Fossilized Amber.

Okay, so onto the technique- Faux Watercoloring!
I started with embossing my images on some watercolor paper. I started my background with some ink blending, and finished off the project, adding in some water and more of the same colours to give a looser, organic feel. I love how this technique really takes your ink blending up a notch, while still feeling like watercoloring, but you have SO much more control this way!

I highly recommend this class to check out the technique fully. Even if you consider yourself advanced in blending techniques, Amy Lee has such a way of presenting, that you are sure to learn some new techniques and you will certainly be inspired! Her card for this technique is truly gorgeous!!


Supplies:
Stamps: Coffee Love
Ink: Versamark, Versafine Black Onyx, Ground Espresso, Gathered Twigs, Wild Honey, and Fossilized Amber
Paper: Early Espresso, Cream Watercolor Cotton Paper (Savoy)
Accessories, etc.: white embossing powder


Sunday, August 05, 2018

Fall to Layout #83


Happy Sunday!

It's a long weekend over here, so I am enjoying the extra day for some relaxation and crafting! This week, I was a bit better about sticking to the sketch. Ultimately it breaks down into a sentiment surrounded by a triad of objects,


My Dimensions used:
Card Base: 4-1/4 x 5-1/2
Image Layer: 3-5/8 x 4-7/8
Image Layer Frame: 3-3/4 x 5

And here's the card, I really wanted to make a space themed card for my friend's birthday, so I started off with a few images from Out of This World and got to colouring. Next I thought I should make a quick galaxy background. I love these and they really are quick and easy. For this one, I started off with a piece of 110lb black card stock (I just buy the pack from Michaels). I used black because it means you don't have to use quite so much ink for blending. I selected Distress Oxide inks,Faded Jeans, Peacock Feathers, and Black Soot and blended on top of that. Next I misted it a few times with the Tim Holtz Distress Sprayer. I wanted more of a starry look, so I stamped some White Snow pigment ink onto an acrylic block (to use as a palette), watered this down and then splattered that all over.

I embossed the "out of this world" phrase on the galaxy layer and popped up the rest of the sentiment on some white cardstock. Truthfully this was done because that part of the embossing smeared! But I actually like the little pop of white it gives.

Final steps were adhering my images. I popped all of these up on foam tape. I wanted the little astronaut tethered, so I drew a little rope with a white gel pen leading off the scene to some unknown tether station, ha!


Supplies:
Stamps: Out of This World
Dies: Out of This World lawn cuts
Ink: Memento Tuxedo Black, Distress Oxide-Faded Jeans, Peacock Feathers, Pigment- Fresh Snow
Accessories, etc: various Copics

If you play along, please leave a link!