Sunday, October 03, 2010

Row of houses.


I figure it's not too late to post a little something in honour of World Card Making Day. I made a few cards this weekend. This was not actually one of them, but I've been meaning to post this one for a few days. I really love this image. I just had to make it bright and colourful. I had wanted to stamp a "Welcome to the Neighbourhood" on there, but I don't have that as a stamp. Besides, the "Congratulations" would likely have more opportunities for use.

Stamps- DoodleFactory Neighbourhood, Boards and Beams (PTI)

Saturday, September 25, 2010

September 2010 Papertrey Blog Hop

I'm glad that this month's hop is an all day event, it gives me time to post something! So this month's challenge...

One of the most fun things about this hobby is the people you meet, whether in person or online, and the things you learn from them. Now is your chance to show off any skills you might have learned from a fellow stamper, and perhaps even give them a little shout out to thank them for the inspiration they have provided. Create a project using one of your favorite learned skills and perhaps after a little blog hopping, we will ALL learn some new tips and tricks and continue to pass on the love of this hobby!

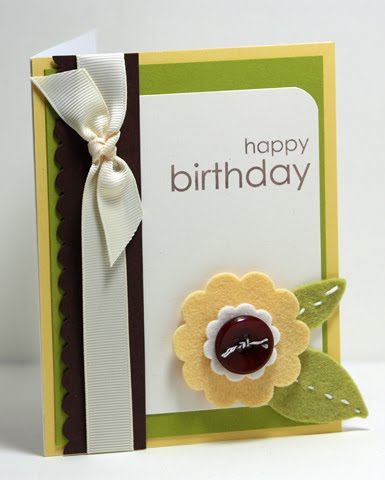
A "skill" I've picked up on from several amazing fellow crafters, is the art of making one's own embellishments- especially the layered flower. I've been cardmaking for over 6 years now, and have always loved the idea of making my own embellishments, but only in the last year have I really started making my own layered flowers. There's tons of inspiration out there!
Dawn McVey has lots of fun cards featuring handmade floral embellishments and instructions to paper flowers here. Michelle Wooderson has a great eye for piecing together mixed media flowers. Just the other day she had a wonderful post up on her blog.

Here's my card:Supplies:
  • Stamps: Birthday Bash Greetings
  • Ink: Rich Cocoa
  • Paper: Harvest Gold, Simply Chartreuse, Vintage Cream, Dark Chocolate
  • Accessories, etc.: Felt, Thread, Button, Vanilla ribbon, scalloped die, corner rounder

Sunday, September 19, 2010

Happy Fright Night

I saw the latest DoodleFactory Halloween release, and just had to get them! I always enjoy Irene's artwork, and the Ghoulies were no exception.

Here's a quick card I put together.


Supplies:
  • Stamps: Ghoulies, Spooky Sweets, Tin Types Background
  • Ink: Tuxedo Black, Fresh Snow, Elegant Eggplant
  • Paper: Ripe Avocado, Smokey Shadow, Pumpkin Pie, Elegant Eggplant, White
  • Accessories, etc.: Goopy edge punch, Copics, pop dots

Tuesday, September 07, 2010

Egads- September!

I guess August was a bit of a busy month (in a mostly good way!), I forgot to update all month! I haven't had much free time. I've made a few cards here and there, but mostly cards for the CAS blog.

So here's a card that was greatly inspired by Debbie Olson that I made yesterday evening. It's pretty basic, but I had fun recreating the tree look using different stamps. I ended up using the tree from Beyond Basic Borders, and leaves from Beautiful Blooms II and Turning a New Leaf.

Supplies:
  • Stamps: Beyond Basic Borders, Beautiful Blooms II, Turning a New Leaf, Birthday Bash Sentiments
  • Paper: Ridinghood Red, Kraft, Vanilla, DSP- Stampin' Up sets from last year
  • Accessories, etc.: baker's twine, pop dots, twill, button, sponge
Thanks for stopping by!

Friday, July 30, 2010

Wedding Roses

Ever since I obtained this stamp set I've been wanting to try the watercolour technique that was really popular last summer with Fifth Avenue Floral. To my delight, it worked wonderfully with PTI's Rose set! I based my layout on this stunning creation by Debbie Olsen. I really liked how the text looked with the roses, but it didn't really work with my technique, so I stamped the background onto vellum and adhered that as a subtle background.

In case you're not familiar with this technique- stamp and emboss (with white embossing powder) the desired image. Have plenty of paper towels nearby. Spritz the image so that each section has a small raised bubble. Take an aquapainter and using reinkers dab colour into each section. Mix colours as desired, let dry at an angle to create a natural gradient. Here's a link to a good tutorial by Patty Bennett.

Supplies:
  • Stamps: Year Of Flowers: Roses, Textstyle II
  • Ink: Versamark, Fresh Snow Reinkers: Pink Pirouette, Ridinghood Red, Old Olive, Kiwi Kiss
  • Paper: Pink Pirouette, Certainly Celery, Melon Mambo, Vellum, White
  • Accessories, etc.: White Embossing Powder, Aquapainter

Friday, July 23, 2010

FTL100 Blog Hop!

In honour of the 100th sketch over at the Clean & Simple Stamping blog, we've organized a small blog hop! Here's the list of designers: Here's my card for the sketch: Supplies: Stamps: Up, Up and Away Paper: Tempting Turquoise, Simply Chartreuse, White Ink: Raspberry Fizz, Summer Sunrise, Orange Zest, Black Accessories, etc.: Scallop edge punch, Sunshine impression plate, green satin ribbon If you play along, be sure to leave your link at the CAS blog!

Tuesday, July 20, 2010

A few OLCs

I was in the mood for some super simple cards today. I just had to get the set Funky Four from the new Stampin' Up! catalog! These cards feature my favorite images from the set. First up, this adorable leaf. I thought it would look nice to feature it in a rainbow type set up. And it seemed appropriate to say "celebrate today".

Next up, I really wanted to feature these mushrooms by themselves. The original image is a group of 4, but I thought 5 would be more pleasing to the eye. I couldn't really think of an appropriate greeting, so "just because" it became!

Supplies:
Stamps: Funky Four, Round & Round
Ink: Bahama Blue, Kiwi Kiss, Daffodil Delight, Tangelo, Lady Bug, Real Red, Black
Paper: White cardstock

Saturday, July 17, 2010

Go fly a kite!

Here's another card made with Up, Up, and Away. I think it just may becoming my new favorite! This card is ultra simple, but I really like how it turned out. I didn't expect to like the Spring Rain, Orange Zest, and Smokey Shadow so much together!

Supplies:
Stamps: Up, Up and Away
Ink: Tuxedo Black, Fresh Snow, Orange Zest
Paper: Smokey Shadow, Spring Rain, White, Orange Zest
Accessories, etc: Cloud dies

Sunday, June 27, 2010

Some more balloons!

Well, I have to say I really enjoy this set (Up, Up, and Away). There are just so many options available with it, and this is only my second card! I wanted to try using some of the line art images with Copic markers, so I stamped 3 balloons and got to work. I wanted to place them on a blue background, and I found that Pacific Point was the perfect match. I ran that through with the Sunshine plate, die cut a few clouds, and then pieced together my scene. For some reason, I wanted the card to be a tall and narrow card, so then I had to figure out how I could add a sentiment to the front. I finally decided on the sentiment flag and thought that red gave it a nice pop.
Supplies:Stamps: Up, Up, and Away
Ink: Tuxedo Black

Paper: New Leaf, Pacific Point, Real Red, White

Accessories, etc.: Copic markers, cloud dies, sunshine plate, pop dots

Friday, June 25, 2010

Papertrey Ink June Blog Hop Challenge

Good afternoon! I was in the mood for something fun and summery for my challenge card. I went with Raspberry Fizz, Orange Zest, Hawaiian Shores, Simply Chartreuse, and White. I just received my latest PTI order yesterday, so I had to make use of it! I love the balloons in Up, Up, and Away and the Sunshine plate is just fun to use! I decided to use it to make some fun hill tops. I decided to use this as a graduation card for my cousin. The family is having a dinner in her honour later today to celebrate.

Supplies:
Stamps: Up Up and Away (plus sentiment set), Round and Round
Paper: Hawaiian Shores, Orange Zest, Simply Chartreuse, White
Ink: Black, Hawaiian Shores, Raspberry Fizz
Accessories, etc.: pop dots, Sunshine Impression Plate


I can't wait to see what everyone else does for this blog hop, I'm sure to find some new colour combinations that I must try!

Thursday, June 24, 2010

Easy Peasy birthday card

While tidying up my craft space last weekend I came across several scraps. I reminded myself that I really need to make better use of them! The tend to just sit in a folder or a pile unused. So I took this piece of patterned paper and River Rock cardstock and got to work. The layout was somewhat based on my FTL39. It's a great layout for using strips of patterned paper!


Supplies:
Stamps: Round and Round
Ink: Not Quite Navy
Paper: Not Quite Navy, River Rock, Urban Oasis DSP
Accessories, etc: piercer, ribbon, corner rounder

Wednesday, June 23, 2010

Flowery Birthdays

I was in a bit of colouring mood the other day, so I decided to make a few flowery birthday cards using some nice line art and Copics. I had a few scraps around from when I was testing out some background stamping. Those colours became my inspiration! I was quite pleased with how they both turned out!
Supplies: Stamps: Friends 'til the End, In Bloom, Birthday Basics, Text Style, Background Basics: Botanicals Ink: Tuxedo Black, Lemon Tart, Bermuda Bay
Paper: Lemon Tart, Ripe Avocado, Spring Moss, White, Hawaiian Shores, Smokey Shadow, Kiwi Kiss
Accessories, etc.: Ribbon, Copics

Sunday, June 13, 2010

Colourful Leaves

Here's a quick and simple birthday card I made recently. I remember seeing on another blog that Taken with Teal looked quite nice with Glorious Green, so I thought I would combine them and see what came of it. I use Glorious Green so rarely, that I was quite happy to find something it works with. I stamped various leaves all over white cardstock and then used one of fall to layouts (# 63)
Supplies:
Stamps: Vintage Picnic, Turning a New Leaf
Ink: Taken with Teal, Green Galore, Glorious Green, Fresh Snow
Paper: Green Galore, Taken with Teal, Glorious Green, White
Accessories, etc.: Gelly Gems

Tuesday, May 25, 2010

Papertrey May Blog Hop Challenge


This month's hop is all about felt! I decided to make a 3-d flower embellishment out of felt. I present to you the most impractical card for mailing! I ended up using my FTL sketch from last week. It just worked well with the flower!

I thought the Hawaiian Shores, Raspberry Fizz, Dark Chocolate, and Kiwi Kiss made for a fun and fresh colour combination! I used Kiwi Kiss in place of Simply Chartreuse, since I don't have it yet, hopefully it's a decent substitute!

Supplies: Stamps: Signature Greetings, Background Basics: Tin Type Ink: Bermuda bay, Dark Chocolate Paper: Kiwi Kiss, White, Dark Chocolate, Hawaiian Shores Accessories, etc.: Large Scallops Die, Beautiful Blooms Die #1

I modified this post's instructions to work with the 6-sided die. I cut out 3 flowers and used those to make my felt flower. I am super impatient, so I used sticky strip to hold the pieces together. It's holding together quite well. In place of chartreuse felt, I broke the fibers of some Kiwi Kiss cardstock, cut that into 2 leaf shapes, added a center score line to each, then curled them a bit more for dimension.

Monday, May 24, 2010

A little bit of masking

Here's a birthday card I made a few weeks back. I really wanted dotted centers for each flower, so instead of tracking down stamps that may or may not have fit, I decided to do a bit of masking. I die cut 3 different sized circles into a few post-it notes, placed them over my die-cut, stamped flowers, then stamped a Polka Dot II basics background over each! It was quite easy!

Supplies:
Stamps: Beautiful Blooms II, Turning a New Leaf, Giga Guidelines
Ink: Green Galore, Raspberry Fizz, Summer Sunrise
Paper: Raspberry Fizz, Green Galore, White
Accessories, etc.: Beautiful Blooms die #2

Sunday, May 23, 2010

Golden Hearts


This is a card I made back in April for a bridal shower. I made the bottom edges using one of the Labels die cut sets. I really like combining small images with the flourishes to make a unique background!

Supplies:
Stamps: Heart Prints, Mixed Messages, Fancy Flourishes
Ink: Gold
Paper: Gold, Vintage Cream
Accessories, etc.: Corner Rounder, Ribbon, Gold Cord, Labels 8

Friday, May 07, 2010

Masculine Birthday


This was one of those cards that came together when I started playing with some new stuff and some scraps on my desk. First I made the wood grain background on the chocolate cardstock. I noticed it was kind of an odd size, so I figured out a layout that would work with it. I really like the leaves in Masculine Motifs and thought they'd look nice with a bit of two-toned inking. I grabbed some craft Chocolate Chip and Terracotta Tile and stamped the one leaf. Finally I finished it off with a Kraft card base and a wood button. Perfectly masculine, right?

Supplies:
Stamps: Masculine Motifs, Background Basics: Woodgrain
Ink: Dark Chocolate, Chocolate Chip, Terracotta Tile
Paper: Kraft, Rustic Cream, Terracotta Tile, Chocolate Chip
Accessories, etc.: Wood button, twine

Saturday, May 01, 2010

New favorite colour?

I finally picked up some of the newest PTI colour, Hawaiian Shores. It's gorgeous! I just kept stamping random stuff with it, and thought it would look really pretty with yellow and green. Lemon Tart and Spring Moss went quite nicely with it. I stamped a background with this cute floral image from Round & Round and added a few leaves. It's quite a quick card, but I can definitely see myself using this colour combination in the future.

After that, I was playing around, making some more felt creations. I thought that Pure Poppy, New Leaf, and Hawaiian Shore would look cool together. I started out making the flower, then the rest of the card just kind of grew around it. Don't you love it when that happens?


Supplies:
Stamps: Round & Round, Masculine Motifs, Background Basics: Retro, Birthday Basics
Ink: Hawaiian Shores, Lemon Tart, Spring Moss, True Black
Paper: Hawaiian Shores, Spring Moss, White, Lemon Tart, Pure Poppy, True Black
Accessories, etc.: Corner Rounder, Buttons, thread, Big Shot die, felt, ribbon

Sunday, April 18, 2010

A little bit of felt

I've made my own felt embellishments before, but it's been a while, so I decided it was time to try out a few things. For now, I'm making do with the felt that's available locally. I found several colours at my local Fabricland. The brand is Ecospun, and the felt is polyester made from recycled pop bottles. So how does it cut?


I did a few tests with thin dies and thick dies. The thick dies cut the felt better. After the cut, I had to go in with a fine pair of scissors and trim a few tiny corners and some of the extra fuzz. It really wasn't that bad though. For .79 a 9x12 sheet, I don't mind!

The thin dies cut well once I added a shim into the equation. I used the cuttlebug and with nestabilities or PTI dies, I found that A,C, die/felt, B, cardboard shim gave the best results. It even embossed the felt a little bit, which was kind of cool!

So here is my completed project. It's a pretty basic layout. I wanted the felt scallops and flower to really be the focus.
Supplies:
Stamps: Polka Dot Basics, Giga Guidelines, It's a Celebration
Paper: Smokey Shadow, White, Hibiscus Burst
Ink: True Black, Hibiscus Burst
Accessories, etc.: Black and Fuchsia felt, button, string, nestabilities scalloped long rectanglies, Blossom Party die


Wednesday, March 24, 2010

Video!

I had originally brought up the topic of video making over on the CAS blog, but since I had shared the Letterpress cards here first, I figured I'd show the video here. This is my first video ever, so please be nice. I was all set to use a Flip camera, but it's apparently MIA (I figure someone else is using it), so I went with the adequate Canon SD1100IS instead. If you have any questions about the technique, feel free to leave a comment! I didn't include the final card, since it was really simple and the night lighting made it hard to get a decent shot of the impression. But you can go here if you're wanting a better idea of what the pressed design looks like.
See the video at Youtube.


Questions asked answered here:

The paper I used in the video was the paper offered by Lifestyle Crafts Letterpress. I got a pack here. I used some Crane Lettra, but haven't found a reasonable source for shipping in or to Canada. I just recently got an order from Paper-Papers.com. They sell quite a few types of cotton paper. I picked up some of the 118lb Savoy in bright white and in natural white. It presses quite nicely!

Although the plates I had made are photopolymer, they are a much harder form than the stamps so many of us crafters use. I have tried to use a photopolymer stamp and it did not go so well. The image pressed into the paper, but so did the entire area around the stamp. Not pretty! The pressure of the machine also caused irreversible damage to the stamp.