Showing posts with label SU. Show all posts

Tuesday, July 20, 2010

A few OLCs

I was in the mood for some super simple cards today. I just had to get the set Funky Four from the new Stampin' Up! catalog! These cards feature my favorite images from the set. First up, this adorable leaf. I thought it would look nice to feature it in a rainbow type set up. And it seemed appropriate to say "celebrate today".

Next up, I really wanted to feature these mushrooms by themselves. The original image is a group of 4, but I thought 5 would be more pleasing to the eye. I couldn't really think of an appropriate greeting, so "just because" it became!

Supplies:
Stamps: Funky Four, Round & Round
Ink: Bahama Blue, Kiwi Kiss, Daffodil Delight, Tangelo, Lady Bug, Real Red, Black
Paper: White cardstock

Thursday, June 24, 2010

Easy Peasy birthday card

While tidying up my craft space last weekend I came across several scraps. I reminded myself that I really need to make better use of them! The tend to just sit in a folder or a pile unused. So I took this piece of patterned paper and River Rock cardstock and got to work. The layout was somewhat based on my FTL39. It's a great layout for using strips of patterned paper!


Supplies:
Stamps: Round and Round
Ink: Not Quite Navy
Paper: Not Quite Navy, River Rock, Urban Oasis DSP
Accessories, etc: piercer, ribbon, corner rounder

Monday, January 11, 2010

A few wedding cards

Well, today is my brother's wedding so I have a few wedding themed cards to share. Having been somewhat involved in the original invitation plans, I knew that yellow and grey were the wedding colours. So I figured I'd use those colours in my creations.

First up, I decided to make a hybrid project. I have the Together Forever stamp set, so I decorated my cardstock with that. I wanted their initials in the fancy circle element, but didn't have the right size font. I used the Stampin' Up colour swatches to make sure it would coordinate with my project once it was printed out.
This second card was 100% inspired by the amazing Silke Ledlow.

She has been doing amazing things with this stamp set. I modified my version somewhat: I used a different punch; I didn't have small silver brads, so I used rhinestones instead; the proportions are slightly different and I used Orange Zest ink and ribbon instead of Dusty Durango.

Monday, January 04, 2010

More leaves!

Seriously, I don't think I can get enough leaf stamps! I have loads of flowers, but I love leaves even more. They can be used for so many occasions! *Oh my goodness, I just came to look over my post, I cannot believe I spelled leaves wrong in my title.*


I had been meaning to make some fun patterned paper using these leaves from the Paradise set, some kraft cardstock, and some pigment heavy inks. After creating quite the swatch with at least 5 different kinds of ink, I settled on using mostly Palette inks. They show up nice and vibrant on the kraft cardstock. I stamped the leaves all over. Next I cut up the paper into 4 pieces 4x5.25 in size. I stamped a few more leaves (this time from Turning a new leaf) then stamped a Textstyle background image over it all in Sahara Sand. Finally, I coloured the edges with Chamomile tea ink. I decided to use some Vintage White cardstock, buttons and jute thread to complete the natural feel.

I had been trying to post more, however life has been bit hectic. Back in early November, my cat was diagnosed with Diabetes. It's been an interesting learning process. Things had been going so well, but she had a hypoglycemic episode the other night (at midnight of course!), so now we have to keep an even closer watch on her, and check her glucose levels more frequently. She is not a fan! And this all comes a mere week before I'm leaving for holidays. So basically, I'm just taking things one day at a time, and hopefully things will settle down by the end of the week.

Happy new year!

Sunday, November 29, 2009

Whoops, it's been a while...

Here's a quick type of card. I had it all sketched out and even had my paper all cut out, but for some reason, it took a few evenings to get it pieced together. I would work on it for a minute or two at time, while waiting for my computer to start up.


Supplies:
Stamps: Signature Christmas
Ink: Rhubarb Tart
Paper: Spring Moss, Rhubarb, Ski Slope DSP
Accessories, etc.: Scalloped punch, organdy ribbon, silver cord, felt snowflakes, brad

Wednesday, November 11, 2009

Birthday Flowers

I just recently picked up Stampin' Up!'s For All You Do set and was playing around with it. Since I also have more than enough Loves Me paper I decided to use that with it. Normally I wouldn't put pink, brown, and green together, but I think it worked out nicely! Here's the result.

Supplies:

Stamps: For All You Do, Birthday Basics

Ink: Bamboo Leaves, Hibiscus Burst

Paper: Raspberry Fizz, Confetti White, Loves Me DSP, Hibiscus Burst

Accessories, etc.: Pop dots, Nestabilities Labels 1, Green Satin Ribbon, Rhinestones, Scalloped Punch

Sunday, June 28, 2009

How Sweet It Is!

Here's a simple and sweet card that I meant to share a week or so ago! I was thinking that I really wanted to make a citrus themed card, but I wanted wedges. I thought for a moment a realized that these images work just as nicely if you cut them in half! I coated on two layers of yellow Spica to make them all sparkly and juicy looking, arranged them just so and added this cute sentiment. Next I found various oranges and a nice textured yellow from my paper stash. Finally I added a bit of ribbon and found that this Melon Berry button matched almost perfectly!
Supplies:
Stamps: Tart & Tangy, It's a Celebration
Ink: Summer Sun, Melon Berry
Paper: Hawaii Papaya DSP, Groovy Guava, Tango Tangerine, White, Textured Yellow
Accessories, etc.: Ribbon, button, scalloped rectangles, pop dots, Spica yellow marker

Saturday, June 20, 2009

Glossy Leaf

I was so focused on my sketch over at my clean & simple blog that I thought I'd take a stab at a not-so clean & simple card. I used the same basic sketch but added several steps. First I stamped the leaf, then I coloured in the non-inked parts with Copics. Next I cut it out and embossed it, twice, with ultra glossy embossing powder. I placed that over a background stamped oval. Next up, creating the matching patterned paper. I cut a piece of glossy white paper, stamped several leaves, then brayered a few inks until I got a colour I was happy with. Then I stamped the Weathered background over that and embossed the whole thing so it would set. I added an extra mat to the patterned paper layer. Instead of going with an ultra neutral card base, I stamped Linen on mustard paper, then sponged the edges. Remember when it was the "cool thing" to use tons of background stamps. It's fun to go back to that style every now and then.
Supplies:
Stamps: Men of Life, French Script, Weathered, Linen, Autumn Leaf Prints
Ink: Really Rust, Dark Chocolate, Cognac, More Mustard, Versamark
Paper: Really Rust, More Mustard, Dark Chocolate, Vanilla, Glossy White
Accessories, etc.: Die Cuts, Scalloped punch and scissors, button, twine, brayer, sponge, pop dots, UTEE

Wednesday, May 20, 2009

H2O Challenge

It's been a while since I participated in one of the challenges, and when I saw that the theme this month was water and watercolouring, I couldn't resist!
Here are the guidelines:

A dip in the Lake....the waves on the Ocean, that little creek down the ravine, the warm rain gently falling, a cold glass of water on a hot day...nothing says Spring and Summer like water. This month we're all about H2O!

Challenge Focus: Create a project that has something to do with water, it can be in your stamps, paper, or embellishments.

Required Element: Watercolouring! If we're doing a water themed project there needs to be some element of watercolouring on your creation.

Restricted Element: If it's H2O that means the two in the equation restricts you to only two embellishments.
And here's my card:

I really love how the watercoloured roses turn out, so I did that as my watercolouring component. I actually colourwashed the whole thing with watercolour paint, let it dry, then I came back to it. I soaked it with water and added in bits of colour with reinkers. I did the same thing with the leaves. When it was almost dry, I added even more colour to make it really vibrant. Next, I didn't want all that vibrancy to fade, so I coated it with glossy Mod Podge. Once that was dry, I added bits of "dew" with crystal effects. The card ended up being quite large- 7x4.25.

Supplies: Stamps: Fifth Avenue Floral, It's Your Birthday, Friends 'til the End Ink/Reinkers: Versamark, Black Onyx, Ridinghood Red, Summer Sun, Old Olive, Kiwi Kiss, Certainly Celery Paper: Ridinghood Red, Watercolour Paper, Confetti White, Ginger Blossom DSP, Pink Pirouette Accessories, etc.: Texture Plate, Satin Ribbon, Nestabilities, White EP, Crystal Effects

And here's a close-up of the "dew".

Be sure to check out all the challenge cards here.

Saturday, May 09, 2009

Had to Try

Once I saw this technique, I knew I had to give a try. I made a few samples before deciding on actually making a card.

First I tried the technique with watercolour paper and paints, it was a bit too washed out. Next I tried it, as suggested, the shimmery paper and reinkers. I liked the result, but I don't have much shimmery paper, and what I do have, I keep for very special occasions. I could see myself really liking this technique, so I wanted to find a cheaper option.

What about regular white cardstock? Well guess what, it works just fine! Regular cardstock tends to curl a bit when wet, so I stamped, embossed, sprayed, and then used two smaller acrylic blocks to hold it down while I went in with reinkers. The plain cardstock soaks up the water pretty fast, but the effect is just as striking. It may take longer to dry, I didn't feel like waiting. Since the water doesn't stay pooled on top for very long, I decided to speed things up with the heat gun. I let each image air dry for maybe five minutes, then came back to it with the heat gun.

Supplies:
Stamps: Fifth Avenue Floral, Friends 'til the End, Father Knows Best
Ink: Versamark, Kiwi Kiss
Reinkers: Summer Sun, Ridinghood Red,Old Olive, Kiwi Kiss
Paper: Barely Banana, Ridinghood Red, Kiwi Kiss, Haiku
Accessories, etc.: white satin ribbon, white EP, pop dots

Tuesday, April 21, 2009

Happiness Always

Although I am no longer a Stampin' Up! demo, I still enjoy the product. I am still part of a stamp club. As a challenge, my demo asked that we make something from our January or February club purchases to bring along to our next get together. So I've been making quite a few items focusing on those purchases. This is actually the third one I've made (I just haven't uploaded and edited the other two yet). Basically, I got these buttons and I really wanted to try the button bow. I followed Nichole Heady's instructions and it turned out great. I also took the layout that she used in her tutorial and applied some of my recent acquisitions to it (ribbon, celery cardstock, buttons, Botanical Blooms- technically the last two were from March's club).
After making the button bow, I stamped Polka Dot Background on So Saffron in Vintage Cream. Then I added some piercing. Next,I figured out how much room I had for the image panel. I stamped a few flowers, coloured them in with Copics, and added a SAB sentiment from a past year. I added celery borders to the image panel and background panel and placed that all on a Vintage Cream card base.

Supplies:
Stamps: Botanical Blooms, Happy Harmony, Polka Dot Background
Ink: Rich Cocoa, Vintage Cream
Paper: So Saffron, Certainly Celery, Vintage Cream
Accessories, etc.: So Saffron grosgrain, thread, button from Buttons Latte, pop dots, paper piercer and guide, Copics

Sunday, March 29, 2009

2 Colour Challenges, 1 layout

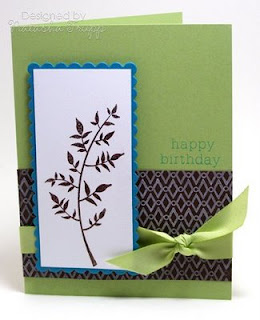
So I wasn't feeling that inspired today, but I wanted to make something, so I checked out a few recent colour challenges. First up was this one by Kristina Werner . What I like to do with colour challenges is pull out a full piece of paper in each colour and see where it takes me. When I saw these 4 together, I thought Retro, which led me to using the Retro Background Basics. I like this diamond and circle pattern and thought it would look cool stamped in white on chocolate. Next, I grabbed Stem Silhouettes. One thing I really like about silhouette images is you can pair them with almost any colour group and any type of greeting. I thought this leafy image matched the whole retro vibe nicely.

Next, I thought about doing this challenge by Dawn McVey. As I assessed the colours, I realized they would work well with the exact same layout. I kept the chocolate patterned part, used celery in place of saffron, and teal in place of tangerine. It worked really well, since the colours in this challenge were of similar brightnesses to those in the previous challenge. The only change here: I embossed the leaves. After the first card was mostly together, I thought, hmm embossing would've worked here. I already had everything adhered so I didn't want to take it apart or emboss over it (since warping would have occurred).

Supplies:
Stamps: Stem Silhouettes, Birthday Basics, Retro Background Basics
Ink: Chocolate Chip, Tangelo, Taken with Teal, Fresh Snow
Paper: Saffron, Tango, Chocolate, White, Teal, Celery
Ribbon: Celery Polytwill, Saffron Grosgrain
Accessories, etc.: Nestabilities, Pop Dots, Brown EP

Tuesday, March 17, 2009

Hybrid Papercrafting

I've dabbled in digiscrapping (perhaps more than dabbled, I just checked my folder, it's apparently 10GB, perhaps it's time to do some purging). I've been stamping for five solid years now. Occasionally, I'll print out a sentiment for a card, but I rarely combine the digital elements with paper ones. So when I saw that Kristina Werner had released some digital papers and elements I decided to give it a try. I also like to support fellow crafters in their new ventures.

First, I went with a zero stamping card. I printed out smaller, card-sized amounts of the patterned papers. I also used the fancy frame brush and a sentiment and placed that onto another one of the patterns before printing it out. The colours when printed were a bit reminiscent of the Loves Me paper (a long retired favorite of mine), so since I still have some coordinating ribbon I added that. The kraft dots ended up printing a bit more caramel in tone, so instead of using a kraft card base, I went with creamy caramel.
Second, I went with a bit of stamping. I printed the frames in several sizes and found that this size held this happy birthday sentiment nicely. Next, I used some more of the stripes, added some more matching Loves Me ribbon and stamped a row of cupcakes. I also brought out the Cool Caribbean, since that coordinated nicely with the printed paper. It's such a good cool!
My verdict on hybrid crafting: I liked it. It's nice to just print out some basic design elements (like the sentiments and frames), as well as papers, and pair them with the other stuff in your stash. Now I may yet put some of that 10GB of digital stuff to work!

Saturday, March 14, 2009

A few Saturday creations

After tidying up my desk a bit and reorganizing a few things, I felt inspired. Amazing what a clean surface can do for creativity.

First up is a card featuring Damask Designs. I was happy with the Ocean Tides, Vintage Cream, and Dark Chocolate colour combination the other day, so I decided to do that again. I added in one extra colour- Sage Shadow. It works quite well with these colours. The card is pretty basic. I did however do one thing I don't normally do... scoring as a means of decorating the card. First I masked off the side, stamped the one repeated background image there, then I scored two lines beside that, leaving enough room for a thin strip of cardstock. I really like how it turned out, I'll have to try that again some time.
Second up is a card featuring Fifth Avenue Floral. One thing I really like about line art is you can use not only for making fun backgrounds, but you can also really bring it to life with some sort of colouring medium. I stamped this flower and stem on watercolour paper, got out a few reinkers and got to work. I added some grey to really contrast with the orange and green.

Supplies:
Card One: Stamps: Damask Designs (PTI)
Cardstock: Sage Shadow, Ocean Tides, Vintage Cream, Dark Chocolate
Ink: Dark Chocolate, Ocean Tides, Vintage Cream
Accessories, etc.: Scor-It, Ribbon

Card Two: Stamps: Sincere Salutations, Fifth Avenue Floral (SU!)
Cardstock: White, Basic Grey, Tangerine Tango, Kiwi Kiss, Urban Oasis DSP
Ink: Timber Brown Stazon, Basic Grey, Kiwi Kiss, Summer Sun, Tangerine Tango
Accessories, etc.: Orange Brads, pop dots, white signo gel pen

Friday, March 13, 2009

#45

Time for another colour inspiration. This week, it's all about keeping things monochromatic with black, grey, and white.

I kept things pretty simple. I made some stamped patterned paper using black, white, and grey ink on grey cardstock. I adhered that to the card, added some 5/8'' black grosgrain and a simple knot. Next I added in my sentiment and stamped a few more flowers on the white base. Very quick, and any colours or sentiments could be used to fit any occasion.

Supplies:
Stamps: Fifth Avenue Floral, Damask Designs
Ink: True Black, Fresh Snow, Basic Grey
Cardstock: Basic Grey, White
Accessories, etc.: Black Grosgrain

Friday, February 27, 2009

Making Cupcakes

This card came together tonight because this stamp set happened to still be on my desk. Considering how often I have a list of "to-do's" or a sketch or colour combination to refer to, I end up making cards pretty randomly. Here's how this one came together...

1) Saw the stamp set: Big Bold Birthday, thought "I haven't used that in a while"
2) I like the cardstock colour lemon tart, there happens to be a piece right here, I'll use that for the base.
3) I want to add dots of colour to the top, so I need two colours that are appropriate for cupcakes and go well together- Sweet Blush and Berry Sorbet it is.
4) A circle card would be fun.
5) I have a friend who's turning 25 this Sunday, this could be her birthday card
6) Maybe I should cover the numbers with glitter and stick them on the cupcake, since it seems a bit plain right now.


Yeah, that's pretty much how it came together. It's kind of nice when the creative process just happens. I didn't set out to make a birthday card for a specific person, but it just seemed to fit

Supplies:
Stamps: Big Bold Birthday, Birthday Basics
Cardstock: Sweet Blush, Berry Sorbet, Lemon Tart, White
Ink: Lemon Tart, Sweet Blush, Berry Sorbet
Accessories, etc.: Quickutz Alphabet, stickles, glitter, pop dots, nestabilities

Saturday, February 21, 2009

Colour Inspiration

I made this card on Thursday for Kristina's colour challenge, but I totally forgot to upload, so here it is now. The colours to use were Really Rust, More Mustard, Kiwi Kiss, and Whisper White.
I had quite a bit of fun making a scenic card. I just got these trees on Tuesday evening so I had to use them. Expect to see more of them over the next little while.

Supplies:
Stamps: Trendy Trees
Ink: Really Rust, Kiwi Kiss
Paper: Kiwi Kiss, More Mustard, Really Rust
Accessories, etc.: Scalloped nestabilities, pop dots

Thursday, January 01, 2009

Happy New Year

Here's a card I made today for a colour challenge . It's been a few weeks, so I thought I'd take part in a challenge again. I'm not super thrilled with it, but that's okay. I was trying to put a slightly different spin on a fall-to layout. I really wanted some patterned Pretty in Pink paper, but I didn't want just solid dots. So I got out the stamp-a-ma-jig and stamped the dotted design from Big Bold Birthday several times over. I like the effect, but doubt I'd do that again. I SO don't have the patience for it.

Supplies:
Stamps: Big Bold Birthday, Faux Ribbon
Ink: Rose Red, Pretty in Pink, Old Olive, Fresh Snow
Paper: PTI White, Pretty in Pink, Rose Red, Old Olive
Accessories, etc.: White EP, SAMJ, circle nests, pop dots, ribbon

Sunday, December 21, 2008

Merry & Bright

Here's a pretty quick card for you tonight. I received this paper this last year some time from a publication. I hadn't used it because I believe I received it some time in the spring. Anyway, I "refound" it and was inspired. I thought it'd be fun to use a rub-on on some ribbon, so that's what I did. It's really very basic and I figured with paper as pretty as this, you might as well let it shine!

Tuesday, November 25, 2008

Make a Wish!

I finally made time to use some of my latest acquisitions. I had been eyeing this birthday set for quite some time and finally picked it up when it was on sale last month. I used the Hawaii Papaya patterned paper as my colour inspiration. It's a pretty standard layout, but I was on a square kick tonight, so that was a slight change.

Supplies:
Stamps: Big Bold Birthday
Ink: Really Rust, Old Olive, Chocolate Chip
Paper: Chocolate, Kiwi, White, Hawaii Papaya
Accessories, etc.: Chocolate Twill, pop dots, stickles