Here are the instructions to make a Big Card Box, like the one seen here. This project is actually relatively simple. All you need are 2 pieces of 12x12 cardstock, a scoring tool, a few punches of your choice, and a large round object (diameter at least 7 inches, I used a plate). The finished project is approximately 5x7x2.5.
Piece 1: Take your first piece of cardstock. Cut it so it is 7.5 x 12 in size. Now score 2.5 inches on 3 sides- the 2 shorts sides, and one long side. On the side that you did not score, you may want to use a punch for extra decoration. Here I used the large oval punch. This punch measures approximately 1-3/4 inches at its widest point. To center it, I measured 5-1/8 from either side, marked a tiny little tic to serve as a guide. Cut in 2.5 inches on either side as shown in the picture. For the closure, measure 1-3/4 down from the decorative punchout. Make a cut from 5-1/8 to 6-7/8.
Picture of Piece 1:

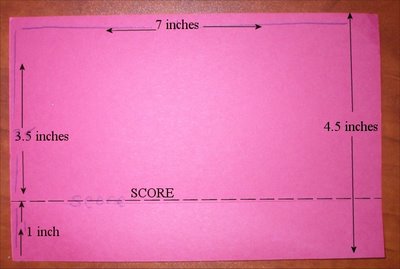
Piece 2: For this piece, take the 4.5 x 12 scrap from the first piece you just cut. Cut it so it is now 4.5 x 7. Score it at the 1 inch point.
Picture of Piece 2:

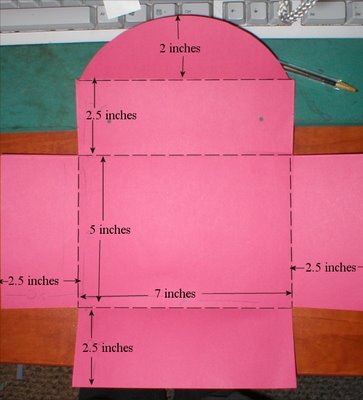
Piece 3: Take your second piece of cardstock. Score it at 2.5 inches, 7.5 inches, and 10 inches. Turn it and score at 2.5 inches and 9.5 inches. Cut away the corners so that it resembles an envelope as shown in the picture. Now, take your large circular object and trace it evenly on the section that is 5 x 2 inches. This part will be the flap. I also punched the 1/8 punch here (as far in as it would go) to serve as a place for a ribbon handle.
Picture of Piece 3:

Assembly: The first piece I attached was the smallest one. Fold at the score. Attach this to the bottom of the biggest piece (#3) I bumped up the folded part all the way to the 2.5 score line (but you could center it if you wanted to). Put tape on the bottom/inside of Piece 1's bottom flap, as well as the side flaps. Attach the small sideflaps to the inside of the side pieces. Then adhere the bottom underneath Piece 3's bottom. Finally, put adhesive on Piece 3's side flaps, and attache these to Piece 1's side flaps. Lastly, make a punch out of your choosing and attach to the center of the curved flap. Adhere it so it will fit easily into the cut slit.
That's it! Decorate it, fill it with fabulous creations! For this box, I attached the designer paper to the front, back, and inside panels before putting the entire thing together. I just took 1/4 inch off each panel measurement. So the front and back are 4-3/4x6x3/4. The inside panel (which serves the purpose of hiding and holding the ribbon handle ends) is 6-3/4x2-1/4. If you are decorating the front with more embellishments keep in mind that your design should be limited to the bottom 3 inches.
It's a really simple design. The only thing that is key is scoring the right measurements so that the box will come together nicely. If you have any questions, I'll do my best to help you out, just leave a comment or contact me through SCS (username tashers).

Your instructions are awesome! Thank you for being so detailed with the pictures and the written instructions. Wonderful and encouraging!
ReplyDelete