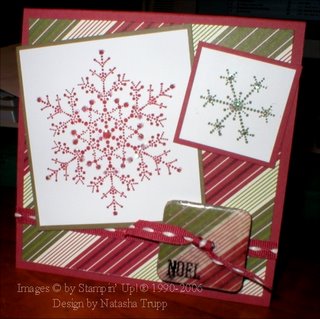
Here's a quick card I made tonight. I've become quite obsessed with incorporating chipboard into my projects. Well, considering all that chipboard is, is die-cut cardboard, it will still set you back quite a bit. My solution... buy the huge "Chipboard Chunk" from Michaels when you have a 50% coupon! I have no desire to use most of the monograms and shapes as they come in this package. But now, I have pages of lovely chipboard shapes to cover!
On this card, I made a little chipboard button. I covered the rounded square with Holiday Thyme paper. Then I sanded it to make smooth edges. Then I embossed it with some ultra thick embossing enamel. Love that stuff, it gives everything such a beautiful shine! Lastly, I punched 2 1/8 holes in it and threaded it with ribbon. Now it really looks and feels like a button. The "noel" was stamped on with black Stazon to cover a smudge from the tweezers that I used during the embossing process (argg!).

Try punching the holes before you emboss, and then use a paper piercing tool (awl) to hold while you heat the embossing powder. You might have to 'open' the holes more later, but hopefully you can avoid smudging.
ReplyDeletelove the chipboard 'button'!! great idea!!
ReplyDeleteI love the details about the chipboard button - so cool! This is a very pretty card! Thanks for sharing.
ReplyDeleteI love the chipboard button idea. I have a button stamp and use that all the time.
ReplyDeleteInstead of using tweezers try embossing in a baking pan or pie plate.
That's how I do all of my small pieces now and no more tweezer pinchies!